☠ WARNING ☠
Launching model rockets is a dangerous activity that can lead to injury or, in rare cases, even death. For your safety as well as the safety of others, follow all guidelines pertaining to the safe use of model rockets described in the National Association of Rocketry’s Model Rocket Safety Code. Some of the small parts included with this device could potentially pose a choking or other health hazard to children. Adult supervision is recommended for children using this product who are younger than 10 years of age. Please be sure to familiarize yourself with local, state, and federal aviation laws regarding launching model rockets in the area where you are operating before using this product. See, for example, the Code of Federal Regulations, Title 14, Chapter I, Subchapter F, Part 101. Care should always be taken whenever dealing with anything that flies. Use this product at your own risk.
LIMITS OF LIABILITY
By using this product, you accept full responsibility for its use and agree that Eronotix LLC will not be legally held responsible for any injury or damage incurred due to the use of this product or any malfunction whatsoever that this product may have, whether good or defective.
1.1 Rocket Alti Description
2.1 Preflight Considerations
2.2 Mounting the Altimeter
2.3 Basic Use for Launches
2.4 Accessing Launch Data in the Field
2.5 Erasing Flash Memory
2.6 Battery Life and Recharging
3.1 Downloading Data to Eronotix Logbook
3.2 Viewing and Manipulating Data in Eronotix Logbook
4.1 Spare Parts and Accessories
5.1 Firmware Updates
6.1 Troubleshooting
7.1 Technical Specifications
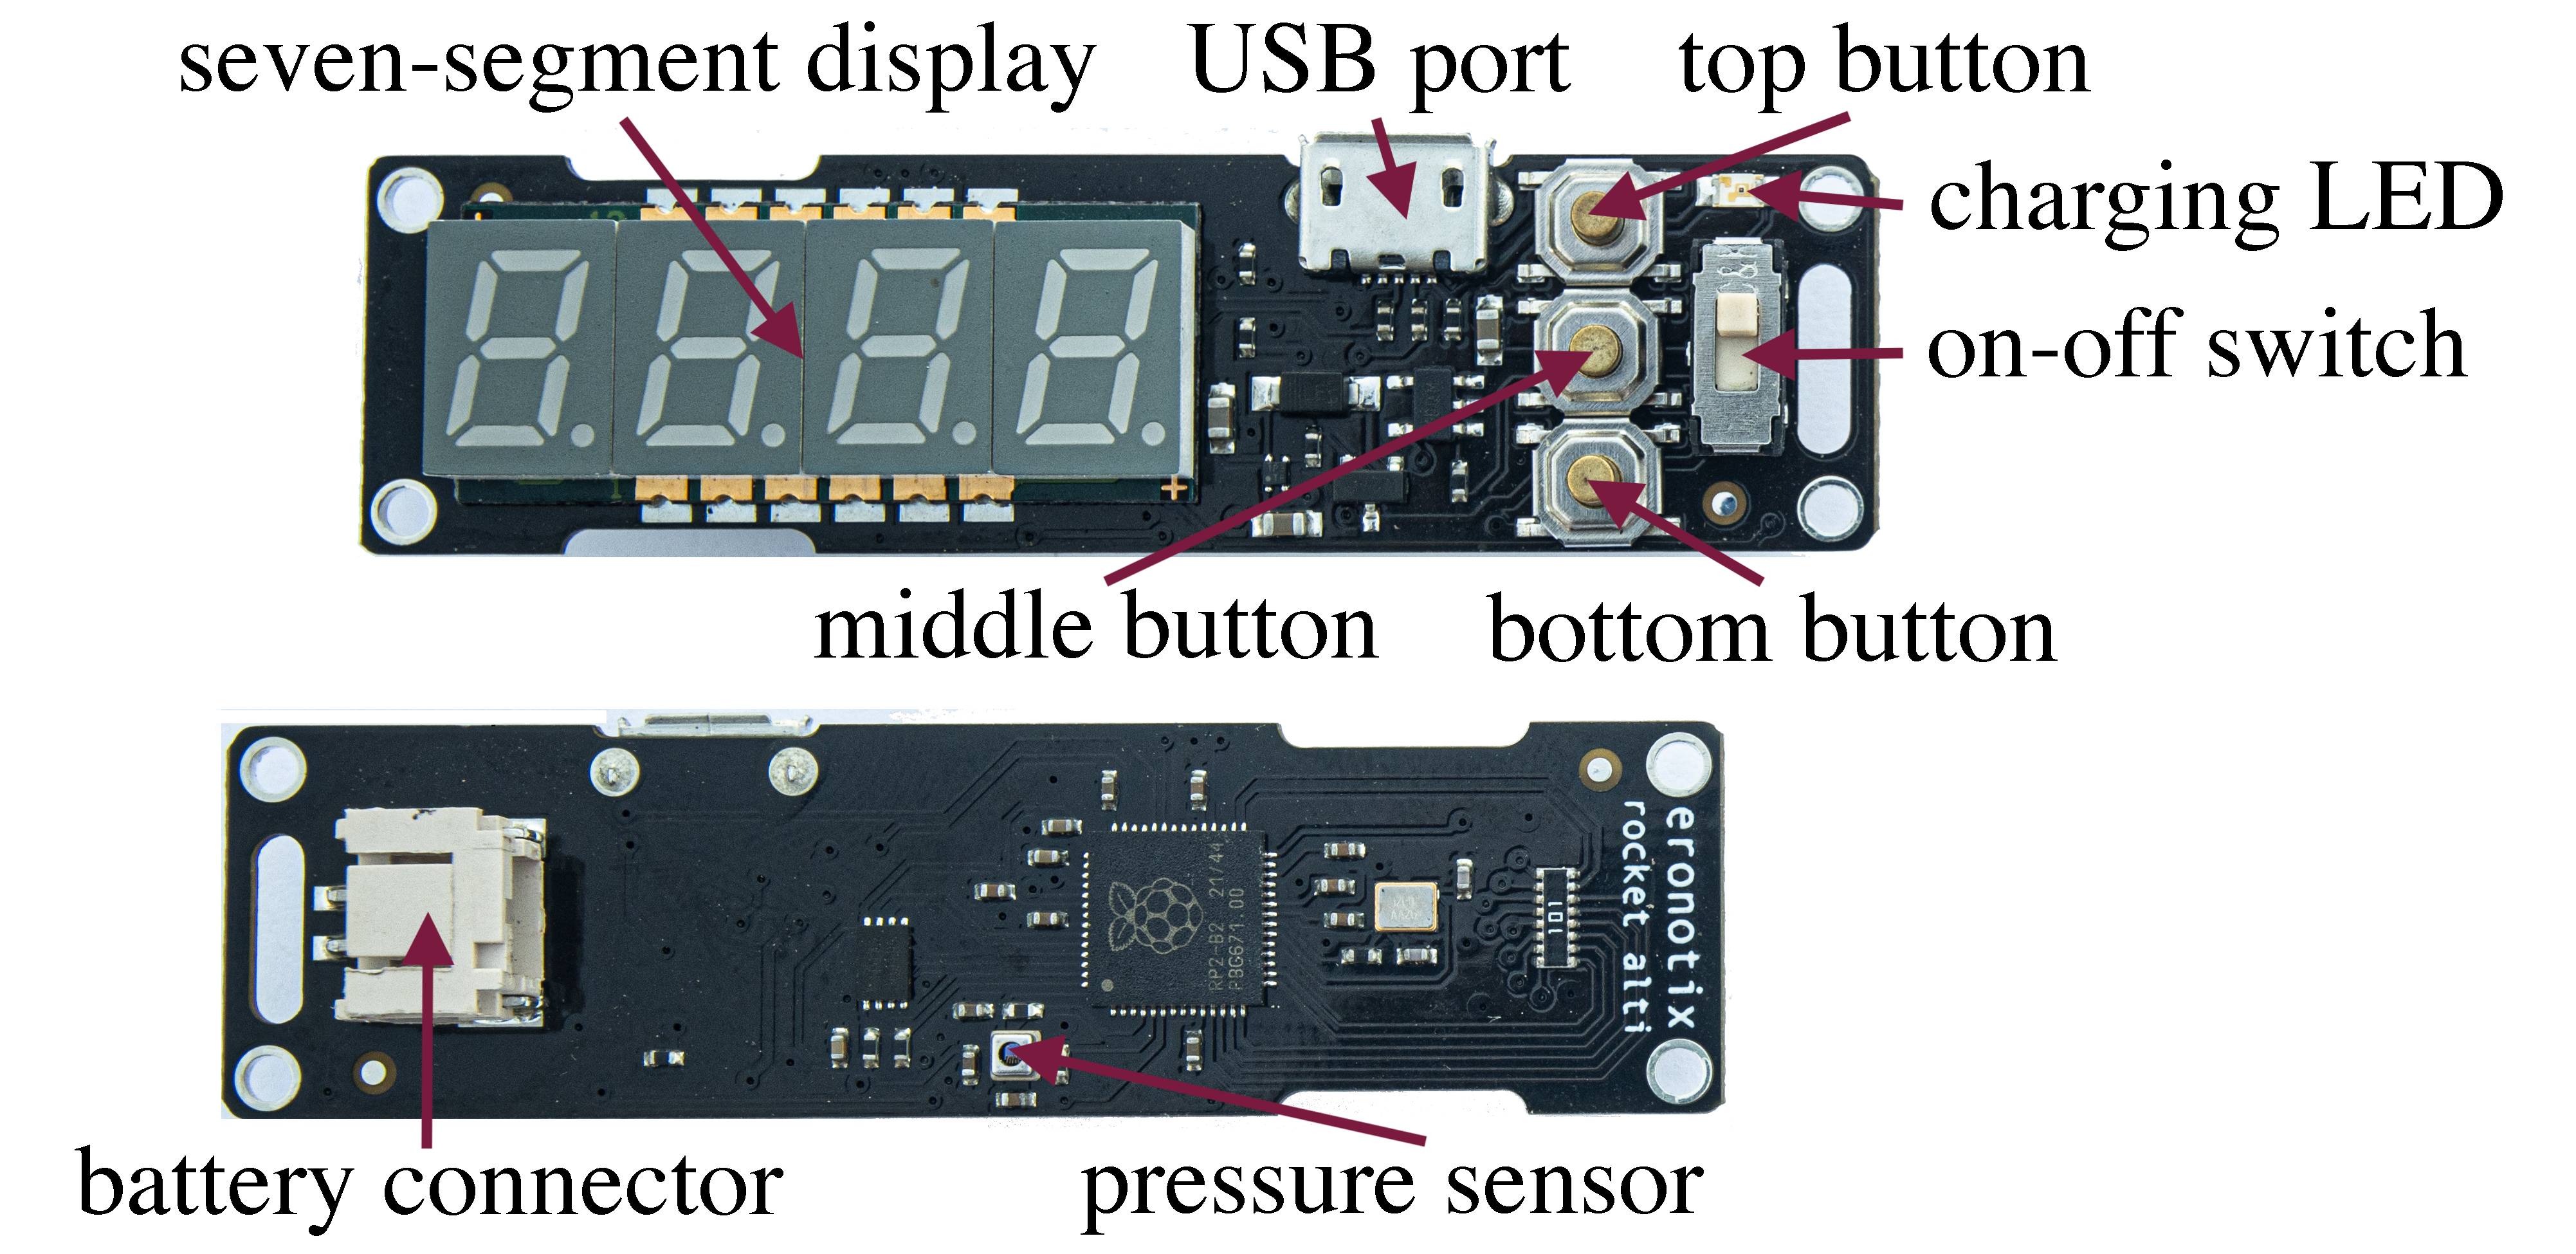
1.1 Rocket Alti Description
Rocket Alti is a data logging model rocket altimeter. It is designed to ascertain how high a rocket flew, how long it took to get there, and how long it took to get back down. In its flash memory it can store up to 16 flights of 512 seconds in length of altitude and temperature data, with a high sample rate of 32 samples per second. It is thin and lightweight in design and has an onboard seven-segment display for viewing flight data in the field. One can also view graphs and download raw data in CSV format after flights are uploaded to Eronotix Logbook, a cloud-based flight logging system.
2.1 Preflight Considerations
The National Association of Rocketry provides a concise Safety Code for launching model rockets. Make certain that you have a rocket that can safely mount the altimeter (ideally one capable of carrying a payload) such that the altimeter will not be damaged or lost as a result of the ejection blast. Some rockets are better suited for carrying an altimeter than others. There are a very large number of payload model rockets on the market.
2.2 Mounting the Altimeter
While there are many ways that the altimeter could be mounted on a rocket, it should be mounted in a place that avoids damage, as it is a raw circuit board (soft landings are also particularly important for this reason). Also important is that it is housed in a non-pressurized compartment, as it is a barometric altimeter. It may be necessary to create small vent holes so the altimeter can more quickly and accurately respond to altitude changes. Direct sunlight also throws off the pressure sensor, so the circuit board should be shielded from this during launch.
2.3 Basic Use for Launches
Always follow the National Association of Rocketry's Safety Code for launching model rockets. After the altimeter is switched on, a battery readout will first be seen in either percent or FULL. Next, a firmware number is displayed. After this, a countdown begins from 30 seconds—this indicates when the altimeter will begin its 8-minute 32-second logging window. You can add time by pressing the top button; this will enable you to select the launch time in increments of 60 seconds (1 minute). If desired, a mobile device can be synchronized with this timer. After switching on the altimeter and setting the timer, the altimeter should be mounted in the rocket if it isn't already. Make certain that the timer has reached zero before launching and that the rocket has landed before the 8-minute 32-second window has passed. The altimeter zeros its altitude when the counter reaches zero and displays REC when recording. The most accurate results are obtained when launching shortly after the recording window begins, simply because of slight variations in atmospheric pressure that can occur from the time the altimeter zeros itself (when the timer reaches 0) to the actual launch. After the launch has concluded, Rocket Alti displays apogee, ascent and descent time. If no launch has been detected, then the display reads NO L. Rocket Alti will cease to function after it has logged 16 flights and it will display FULL. Section 2.5 below shows how to erase the flash memory.
2.4 Accessing Launch Data in the Field
The apogee (highest altitude reached) in feet, plus ascent time and descent time in seconds, are all shown on the seven-segment display after a launch has been completed. You can also scroll through the logged flights in the flash memory by switching on the altimeter and pressing the bottom button during the countdown—this enters the onboard logbook. Then the top and bottom buttons can be used to go back and forth. To exit the logbook, turn the altimeter off and then back on.
2.5 Erasing Flash Memory
Erasing the flash memory is not a reversible operation. To erase the flash, hold down both the top and bottom buttons at the same time while switching on the altimeter until you see ERAS and then DONE. After uploading data to Eronotix Logbook, you will also have the option of erasing the flash automatically through Eronotix Logbook.
2.6 Battery Life and Recharging
Although it is small, you can get several hours of logging before the battery on Rocket Alti needs to be recharged. Recharging the battery takes about 45 minutes when the battery is empty. It's a good idea to recharge the battery before a day of logging. Extra batteries are available in the Eronotix Store.
3.1 Downloading Data to Eronotix Logbook
You must first set up an account with Eronotix Logbook before uploading data. Follow the steps in the instructional video to download data from your altimeter to Eronotix Logbook: 1) switch the device off; 2) open Chrome or Edge browser (do not enter an address); 3) plug the altimeter into the computer with a data cable (must be a data cable; many cables are charging-only); 4) click on the link that pops up; 5) go the Upload section and press the Download from Device button and wait several seconds (press again if it did not work; it may be necessary to first press the connect button); 6) after the list appears, delete any flights you do not want entered into the log; 7) press the Upload to Database button.
3.2 Viewing and Manipulating Data in Eronotix Logbook
Eronotix Logbook is a sophisticated logging solution with many features. For this reason, a separate manual has been created for Eronotix Logbook. The video below outlines its features.
4.1 Spare Parts and Accessories
Visit the Eronotix Store to purchase original replacement parts and accessories for Kite Alti.
5.1 Firmware Updates
The procedure for updating firmware, similar to uploading a file onto a USB drive, is shown in the video below. Go to the firmware page to download the latest firmware. Be sure you are using a data USB cable, such as the cable that came with the altimeter, in order to update the firmware.
6.1 Troubleshooting
If you see FULL displayed on your altimeter, it has run out of flash memory and needs to be reformatted (see above instructions on Erasing Flash Memory). If your Rocket Alti fails to function, try plugging it in to see if the battery may be the problem. If you see ERR1 displayed, this indicates a failed pressure sensor in the altimeter. If you are unable to get your device to connect to the computer, try a different cable; some cables are for charging only. Also, make sure you are using the Chrome or Edge browser and that the altimeter is switched off when plugging it in. Contact Eronotix at support@eronotix.com for additional support.
7.1 Technical Specifications
- Dimensions: 60.0 × 16.9 × 12.1 mm (2.36 × 0.67 × 0.48 in)
- Weight with battery: 7.2 g (0.25 oz)
- Battery: rechargeable lithium polymer 3.7 V 100 mAh
- Operating temperature range: −40° to +65° C (−40° to 150° F)
- Operating altitude: −500 to 9,000 m MSL (−1,640 to 29,528 ft)
- Altitude relative accuracy: 0.75 m (2.46 ft)
- Sample rate: 32 Hz
- Charging temperature range: 0° to +50° C (32° to 122° F)
- Display type: green four-digit seven-segment, common cathode
- USB connector: Micro USB 2.0 Type B
- Data logged: altitude and temperature
- Data capacity: 16 flights, 8 minutes 32 seconds in length